Online Booking System manual
1. What and where is the Online Booking System?
1. What and where is the Online Booking System?
COBE Lab's Online Booking System, available at booking.cobelab.au.dk/Web, enables researchers to quickly gain an overview of availability of COBE’s resources (rooms, equipment, computers, etc.). Researchers are able to view, edit and book resources, and synchronise bookings with mail clients such as Microsoft Outlook.
The booking system also offers researchers a basic overview of their current and past projects in COBE Lab. Researchers will be able to see the status of each of their projects, and a list of what is needed to make their planning projects active.
COBE Lab offers many types of resources, big and small. For management reasons, resources in the booking system are divided into categories:
- Labs and Equipment: Rooms and the most popular equipment (e.g. eye trackers, cameras, BIOPAC system, etc.)
- Computers, Tablets and Software: Laptops, desktop computers in storage, iPads, and different types of software
- Misc. Equipment: Resources that are rarely used, but are available to book
Resources from the same category can be booked together in a single booking. Resources from different categories must be booked separately.
In addition to resources, we also offer accessories, which can be added to a booking. Accessories are minor resources, such as portion cups, tripods, etc. Some accessories can be booked with any kind of equipment. Others are specific to equipment type. If a researcher e.g. books a BIOPAC system, they will have the option to add BIOPAC modules to their reservation as accessories.
Should you have any questions about how to use booking.cobelab.au.dk/Web, please contact [email protected].
2. Getting access
2. Getting access
Researchers will be provided with a username and password for the site by Lab Management. Once logged in, select ‘My Account’ > 'Change Password’. Update your password so that it is personal. You can also edit your email notifications settings for when reservations in your name are created, updated, or deleted. These settings can be managed in ‘Notification Preferences’.
COBE Lab has a data processing agreement with Booked. Under this agreement, no information besides name and email is collected. Please do not add additional information like e.g. your position to your account.
3. Project information overview (dashboard)
3. Project information overview (dashboard)
After logging in, you will be directed to your dashboard. You will be able to see Announcements, Upcoming Reservations, and Resource Availability (see figure below).
Announcements offer an overview of all your projects and their individual status. A project is either in the planning, active or completed stage. Projects in the planning stage are listed first, then active projects, and then completed projects. You are only allowed to book rooms or resources when your project is active. If the project is in the planning stage, the announcement will include a list of what needs to be done to make the project active.
Upcoming reservations show your bookings for the coming two weeks.
Resource Availability offers an overview of available and unavailable resources. You can book directly from this section by clicking ‘Reserve’.
5. Making repeat bookings
5. Making repeat bookings
In a hypothetical example, consider wishing to book Lab 2C between the hours of 07:00–19:00 Mon–Fri, Jan 6–10th. There are two ways of doing this:
After observing that the resource is available, one can proceed by
- making one single booking spanning Monday to Friday (i.e., 108 consecutive hours).
- making a repeated weekday booking (60 hours).
COBE Lab’s policy is to prevent bookings spanning multiple days (option 1), as this will result in inflated usage numbers. Instead we require the repeat bookings function to be used (option 2), as this gives a much more accurate indication of when the resources are in use. This also allows specific instances to be edited without affecting other sessions. As a result, other researchers outside of your project can book that resource during the time that it is made available via the cancelling of one or more sessions. It also gives the option for lab management to do maintenance once you are done for the day or before you start in the morning.
To make the repeated booking as outlined above, go to booking.cobelab.au.dk/Web > 'Schedule' > 'Bookings' > choose a resource and/or a timeslot.
On the reservation page, make sure the ‘Beginning’ and ‘End’ dates are the same date (here: 6 January).
Go to the ‘Repeat’ field and change the setting from ‘Does Not Repeat’ to ‘Daily’. This will give the following additional options:
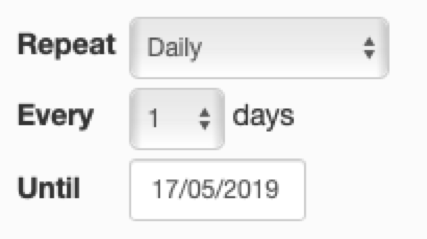
‘Every’ is not the duration of the booking, but the interval of the repeated booking. It should almost always be left as 1.
Change ‘Until’ to the last date of the booking – 10 January.
Fill out the rest of the booking as normal, and end with ‘Create’. Check that booking was created correctly.
6. Editing a single session in a repeat booking
6. Editing a single session in a repeat booking
Consider than on Thursday 9 January you are unable to conduct your research, and you need to delete your booking so other researchers have access to the resource. If the booking is within the next two weeks, you can access it directly from your dashboard. Otherwise, go to ‘Schedule’ > ‘My Calendar’. Go to the date in question, 9 January, and you will see your booking.
Click the booking on 9 January. This will bring you to the reservation page. Click ‘More’ > ‘Delete’.
The following pop-up will appear:
Choose the option that applies. For this example, it is ‘Only This Instance’.
Your booking for 9 January has been deleted.
7. Booking keys
7. Booking keys
Eventually, you will be able to book keys via booking.cobelab.au.dk/Web. This feature will be available once we adjust the system to our needs.
8. Booking overview
8. Booking overview
To get a full overview of your bookings, go to ‘Schedule’ > ‘My Calendar’. Make sure ‘Change Calendar’ is set to ‘All Reservations’, which lets you view all your bookings.
‘Resource Calendar’ will show every existing booking, and not just the ones you created. It’s a helpful tool to check availability of different resources.
9. Syncing booking information with your calendar
9. Syncing booking information with your calendar
Adding a Reservation to your calendar (Outlook, iCal, Mozilla Lightning, Evolution)
When viewing or updating a reservation you will see a button to Add to Outlook. If Outlook is installed on your computer then you should be asked to add the meeting. If it is not installed you will be prompted to download an .ics file. This is a standard calendar format. You can use this file to add the reservation to any application that supports the iCalendar file format.
Subscribing to calendars
To subscribe to a Schedule calendar, open 'Schedule' > 'Resource Calendar' and select the schedule you want. On the right side of the page, you will find a link to subscribe to the current calendar. Subscribing to a Resource calendar follows the same steps. To subscribe to your personal calendar, open 'Schedule' > 'My Calendar'. On the right side of the page, you will find a link to Allow or Turn Off calendar subscriptions. Choose Allow, then subscribe to the calendar as with the others.
In most cases, simply clicking the Subscribe to this Calendar link will automatically set up the subscription in your calendar Client. For Outlook, if it does not automatically add, open the Calendar view, then right click 'My Calendars' and choose 'Add Calendar' > 'From Internet'. Paste in the URL printed under the Subscribe to this Calendar link. You should now be subscribed to the calendar.